Tuesday 7 May 2019

Converting photo into engraving.


I love look of old banknotes. One of my projects was to convert photo to have similar look and feel as engraved portraits.

There are numerous plugins and tutorials available - some use Photoshop plugin, some use tinkering with adjustments and filters.
None of them got me result I wanted. Technique below is much slower and tedious, but it produces superior (in my opinion) result.

While I'm big fan of Adobe products, some people might find pricing a barier, so the tutorial below uses only free tools. Having said that, I'm sure all steps can be easily recreated in Photoshop and Adobe illustrator.

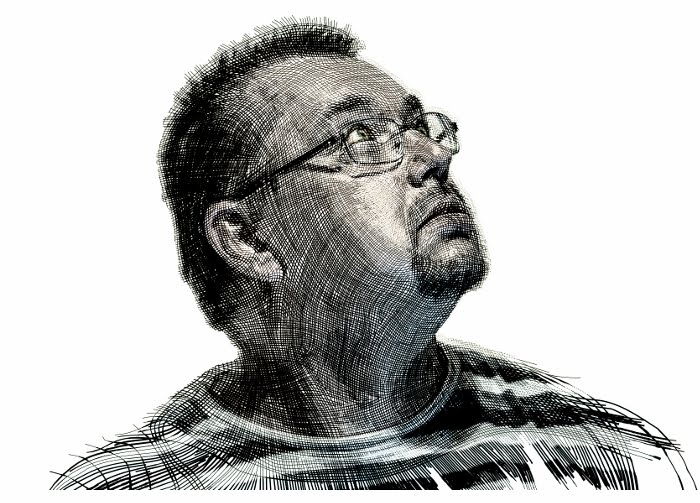
Lets start with comparison of original image, and final effect:


Part 1: Create "Sketch" Image

The "sketch" will be used later when working with  Inkscape. This step is optional and you can use your normal picture instead. Using "sketch" has however some advantage: Lines are more visible on pale greyscale image. Also, some details more visible and it helps when planning lines in part2.


  1. Load image into GIMP
  2. Duplicate layer and select top one.
  3. Blur (Filters -> Blur -> Gaussian Blur) I used blur as 1/200 of the image long side. For image of 4000px on long side, I used 20px blur
  4. Change top Layer mode to "Grain Extract"
  5. Flatten image  (Image -> Flatten Image)
  6. Change contrast (Colors -> Brightness and Contrast). Make it look like pencil sketch. My settings were Brightness 45 and contrast 100.
  7. Make it B&W (Colors -> Desaturate) I used Lightness but any choice is ok.
  8. Save as JPG with new name (I will call it Pencil_Sketch.jpg).


Part 2: Create "Sketch" Image

This is most daunting, boring and time-consuming (It took me approx 20 hrs to do so) part of the process. It is also most important and the one that makes it look  different from some photoshop actions. The idea is to have lines follow the shape of the face features.
  1. Open Inkscape
  2. Import image Pencil_Sketch.jpg (File -> Import)
  3. Add some lines that follow the main features on the image.
  4. Add some lines between, and then perpendicular lines to make "Squares".
  5. Once you have main lines, add more and more to have final set. The target is to have almost fully black image when line width is set to 5-6 pixels, and quite bright when line width is set to 1 px.


Tips:


When adding lines use separate layer for this task. .Create lot of points when drawing a path, and then press Ctr+L (Path -> Simplify) few times. It will make line smooth. My first attempts were without simplifying and the paths were very rough. In final image it didn't look like engraving.
When adding more and more lines try to keep distance between line equal On first image you can see additional lines distributed evenly between original (blue) lines. However the distance between lines varies. On second image shorter lines were added to keep uniform grey average. This is correct approach.
Adding lines was slow, but in the end I got desired density of lines:
 
Enlarged portion:


Part 3: Export images

  1. Hide layer with sketch
  2. Change color of all lines to black.
  3. Change width of all lines to 6px.
  4. Export png image (File -> Export PNG image)
  5. Change width of all lines to 5px, export as PNG with new name.
  6. Repeat with 4px, 3px, 2px, 1px and finally with 1px but with dashed line.


I found it better with white background layer. Also I have added some markers to easily align images later (however if you keep the same size of all exported images it might not be necessary.
Also I have used width of the line in file name (for example Engraving_lines_6px.png) which helped later.

Few (not all) images exported.


Part 4: Export images


During my first attempts I split original image into areas with different black levels by dividing the whole band (0..255) to equal ranges. But it didn't look right as some of the line widths were too dark.
The average black level between 6px and 5px lines is almost the same but it changes quickly between 2px and 1px.  So I had to calculate black levels for each linge width. It very much depends on how close were the lines created in part 2

  1. In GIMP open Engraving_lines_6px.png
  2. Select rectangular area of the picture that is almost black. Filter -> Gaussian Blur with big distance (150 px or more).
  3. Use eyedropper to pick average color and make note of the value (see below).
  4. Close image without saving.
  5. Repeat for other exported images.

At this point I had a table of black levels which looks like this:

Line widthBlack Level
6px0
5px15
4px18
3px56
2px98
1px170
1px dashed224


Part 5: Split original image into levels

  1. In GIMP open original image. Important:  If your original image has different size than lines exported from Inkscape, then resize it to match.
  2. Duplicate layer and rename it to Original B&W or something similar.
  3. Make it B&W (Colors -> Desaturate) Choose option that is most pleasing ;)
  4. Extend black-to-white range. (Colors -> Levels). There are two options: Move black and white triangles to the edges of histogram (marked in red) or click on black eyedropper and pick a color on image that is darkest. Then use white eyedropper to pick color that is lightest (marked in blue).
  5. Duplicate Original B&W layer
  6. Create level. (Colors -> Threshold). Now you can use the black levels that you found in the step 4. Put it in the box on left side (marked red).
Step 4:


Step 6:


Part 5: Apply lines


  1. Make all layers not visible except 6px.
  2. Open Engraving_lines_6px.png as new layer (you can simply drag it to image).
  3. Move this layer just above layer 6px.
  4. Change layer mode to "Lighten only".
  5. At this point you will have the 6px lines covering only the areas that are dark enough. There are two options: Merge visible layers. After merging make layer not visible. OR Create layer group and put Engraving_lines_6px.png layer and 6px layer into it.
  6. Repeat for 5px .. 1px dashed.
  7. Once you have either multiple merged layers or multiple groups change the layer/group mode to "Darken only" (except the lowest - 6px layer).

Part 6: Final touches


  1. You can use original B&W layer to draw the shape of yes (and eye whites).
  2. If you want the dollar bill look-and-feel flatten image and use Colors->Colorize.
  3. If you have some lines extending to far from portrait (as I had) Create masking layer or paint over those lines.


Wednesday 9 March 2016

Birefringence basics

In one of my previous posts I mentioned birefringence. Here are some more details.

Polarizers set up the direction of light polarization. If you apply two filters at the same time you can get  complete light blocking, complete transparency or something in between. This is how some adjustable Neural Density filters work. 

Some materials change the polarization of the light. If such object is place between two polarizing filters set to maximum blocking, the only thing one can get in the picture is the light disturbed by such material.

In order to try birefringence photography following are needed:
source of polarized light  - LCD screen/tv/monitor/tablet works perfectly. 
object made of material that disturbs polarization - cheap plastic is perfect, hi-quality glass is useless.
polarizing filter attached to your camera.

Place object in front of the polarized light source, rotate the filter so the source looks black and shoot.

Depending on orientation of the object polarization changes, so try moving object around.

As example I used plastic bag/pocket. First two pictures are without setting the polarizing filter to full black to show how the orientation affects color.


And now with polarizing set up to black


The thicker material the more interesting patterns you can see. 

The color of the light (or image displayed on the screen) affects the result. First I used blue droplets background (filter not set to full black).


Now with filter set to black:


The same setup, but with green/yellow background displayed on the screen:


The more complex shapes add more patterns to the polarization and in effect more interesting result


Hope you will enjoy your birefringence project. Please add comments or questions. I'm feeling quite alone in this blog ;).


Bookeh shapes

Not to anyone's surprise there are two characteristics of the hole - shape and size.

Common advice is that cutout size has to be smaller then the real apperture - so for 50mm lens and f/2 it has to be smaller than 25mm

Cutting tiny shapes is not my thing (I'm not great at DIY) and the results were far from pleasing. In most cases edges were jagged and you could spot it in the final pictures.


And another example with skull and bones.


Even that I put a lot of effort to do it correctly you can see that it is not something I can be proud of.

I decided to go digital. I have used laser printer to print on transparent media (transparent foil used for presentations). I'm not sure if it is related to the toner or set-up of the printer, but the results were quite bleak.


I used permanent marker to blacken surrounding area.


The advantage of this method is that I can use extremely complex shapes.


The disadvantage is that foil is not crystal-clear and it adds soft focus effect (like pantyhose over lens). This is even worse when shape is complex and have some dark elements in the middle.


If the shape has a lot of empty space in the middle it gets slightly better.


Another test I did was based on the fact that cutout adds shape to the lights, but it can also add some color. I used the same foil, cut the shape of the heart (ok... shape of something vaguely similar to heart) and marked edges using red marker.


The effect:


It can be improved, but it suffice as proof of concept.

I have already planned some more tests:

  • using laser cut shapes - it will take time as it require some preparation.
  • using combination of color foils to get multi-color bokeh.


Have fun.

Thursday 18 February 2016

Bokeh Setup

As promised before I would like to describe my setup for custom shaped bokeh. 

At first I checked what others had to say about it and try their ideas. I tried a lot of them 

1) fancy paper shape held by rubber band 

  • Advantages: 
  • Lightweight 
  • Cheap 
  • Disadvantages 
  • Tends to get folded in backpack. 
  • Rubber band and bits of paper tend to obstruct my manual focus ring. 

2) Paper tube shape put over the lens. 

  • Advantages: 
  • Lightweight 
  • Cheap 
  • Disadvantages 
  • Even more prone for backpack crushing. 
  • Still obstructing manual focus ring 
  • More complex to create 
  • Need some way of changing cutout shapes. 

3) Plastic tube shape over the lens 

  • Advantages: Looks slightly better than paper version 
  • Still cheap 
  • Disadvantages: 
  • Plastic tube has to match outer diameter of the lens perfectly - if it does it scratches outer parts of the lens. If it does not then it rattle a bit and can easily fall off. - I did try slightly bigger tube with some EVA foam as cushioning, but results were far from great due to lack of DIY skills on my part. 
  • Complex to create, 
  • Needs some way of changing cutout shapes. 

4) using old socks as described in this tutorial. 

  • Advantages: 
  • Cheap 
  • Easy to mount
  • Disadvantages: 
  • Not something I would like to be seen with. 
  • Blocks manual focus ring. 
  • Did I mentioned the looks? 


I'm far from saying that all of those are bad ideas. I just was looking for better setup. My goal was to create something that: 

  • Is easy to attach to lens 
  • Doesn't cover manual focus ring 
  • Is sturdy 
  • Allows changing bokeh shapes 
  • Does not pass light on the sides 
  • Is easy to store and carry 
  • Does not attract disgusted looks 


Some of my designs would make me instant internet meme, so I won't describe them. The best one - the one I'm using now - consists of three elements: holder, paper insert and foam filler. 

The holder is the step-up adapter 55-77 - my lens has a 55mm diameter filter screw. Additional space helps holding the card with custom shape hole and prevents light leaks Holder 


The paper inset is circle cut from black technical paper with custom shaped hole in the middle. As I'm using 55-77mm adapter as the holder the circle diameter have to be slightly smaller than 77mm to avoid brushing against thread. If it is too big the paper bends outward and it is harder to remove from holder. Talking about removing it - I attached a piece of tape to each circle to make it easier. Insert 


The foam filler is the circle cut of black craft EVA foam (purloined from my daughter school project). The outer diameter is 77mm - this circle has to fit the thread and hold the card in place. There is a hole in the middle (approx 25mm) - has to by slightly bigger than the size of the shaped hole in the card. Small piece cut at the top allows easier removal.


Insert card is put in holder  and held by filler. Holder can be attached to lens as long as needed. For regular photo (without custom bokeh) I simply remove foam and card. At end of the session I unscrew the adapter. 


All together (holder, filler and few inserts) fit without problem in filter box. 


Next time I will describe different attempts at cutting complex shapes and the outcome, so please come back. 

 Any comments or suggestions are more than welcome.

Monday 15 February 2016

Blur Bokeh

While working with custom shaped bokeh I initially tried the standard heart and star shaped ones and then moved to some complex shapes. In some cases it worked perfectly in some effects where not visible or not worth the effort.


I will write another blog entry related to custom shaped bokeh and tests I made (hopefully quite soon). 

One of the shapes that I tried lead to interesting effect. It is the bokeh in the shape of the slit.


At first I tried to do it using my typical bokeh models (very patient, lot of personality and great at standing still) and my normal setup with some lights in the back.


Lights were not that interesting, but I noticed that the other elements of background looked blurred horizontally as well. 

In most tutorials you will find tips suggesting to have distinct lights far in the back. However bokeh works also in full light outdoor conditions - custom shapes are just not as easy to notice. Even better! So my next attempts were concentrated on shooting slit bokeh during the day. 

Both camera position and photographed object did not move during shooting following pictures:


Conclusion is that slit shaped cutout makes bokeh effect similar to motion blur (direction depends on angle of the slit). It is not exactly the same blur effect you get when panning picture aiming at fast moving object, but close. 

I'm not great at panning - high percentage of my panned pictures have main object blurred as well - this method had additional benefit for me. The object/model does not have to move at all. Having said that there are differences that many can dislike. For example picture of the car that is done with this motion blur bokeh will have wheels not blurred, while the one done with panning will have them blurred due to spinning. I will update this entry once I have photo good examples.

Update (18-02-2016): I tried to use it with landing plane. As the plane was far enough, the effect was almost not visible. So the motion blur bokeh method is better for objects that are really close. I will try with macro photography.


Tools needed:
  • Lens with big aperture (mine is 50mm 1.4)
  • Piece of cardboard/this paper.
  • Scissors
  • Way of attaching the shape in front of lens
Process:
  • Cut the shape of the slit (few mm wide) in cardboard.
  • Attach in front of the lens so the slit is positioned centrally.
  • Set to aperture priority and open as wide as possible.
  • Shoot object that is quite close with background far back.
Things to try next:
  • Different widths of the slit.
  • Slits in not linear shapes (waves, long ovals, zig-zags).
As previously, I would appreciate any comments/questions/suggestions. 

Hair birefringence and LCD backlight

One of the tricks I tried is birefringence of plastic objects. I set up LCD screen (tv), polarizing lens and some objects that would generate required effect (like the bottle below).


At some point my daughter walked into frame. She usually moves way to fast and considers posing to be extremely boring. This time she was preoccupied with some snack and I managed to shoot few pictures. However it was done with the setup I had for testing birefringence (in front of LCD TV, and my lens had polarizing filter on). I immediately discovered that her hair affected light in similar way as some plastic objects.


From this came idea of using LCD screen to highlight the hair of the person. Few days later I shoot few more pictures with slightly better light setup,


I tried it with myself as subject, but since my hairstyle is far from lush/luxuriant the effect was not that great. It doesn't mean it was complete disaster. Hair were highlighted from the back with the colors displayed on the screen.


This led to more attempts and LCD displaying color patterns can create interesting lighting for portraits. I didn't use much of the additional lighting (just whatever was available in the room), however to add some dramatic lighting I held a tablet with a one-color image displayed. Below is the test with some pattern displayed on screen (I have intentionally rotated polarizing filter to show the pattern behind).


Tools needed:
  • Lens with polarizing filter.
  • LCD TV (the bigger the better).
  • Ability to display patterns on that screen.
Process:
  • Put subject in front of the screen (back toward screen).
  • Display color or pattern on the screen.
  • Rotate filter so the screen looks black.
  • Shoot.
Tips and Tricks:
  • Distinct patterns (like horizontal b/w stripes) do not have much effect. I was hoping that skin would reflect part of the pattern, but was unable to do so. I will try to make skin more reflective by using baby oil in the future.
  • Color wheels, or two color gradients work nicely.
  • If subject is close to the screen the effect of back-lighting is more visible.
  • Clean your screen - the dirt on the screen (yes - I'm ashamed) is adding bright spots to the background - I had to remove it in post-processing. As example see last picture.
Hope you enjoyed it and will have some fun testing this technique. I would appreciate any comments/questions/suggestions. I will answer them as fast as I can.


Yay! First post!

I'm an amateur photographer. Amateur as in photography is not my profession. I do try different techniques both during the shooting pictures as well as during post processing. Some of them are well known, but some were invented (mostly by accident) by yours truly.

So I decided to create a blog to document some of attempts and share my observations, tips, tricks and quite possibly what went wrong.

Welcome and please share your opinions and suggestions.