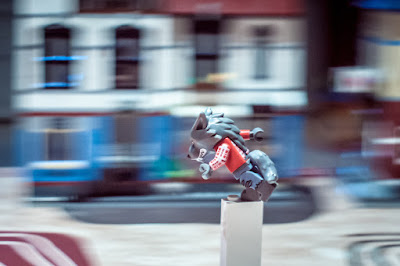
While working with custom shaped bokeh I initially tried the standard heart and star shaped ones and then moved to some complex shapes. In some cases it worked perfectly in some effects where not visible or not worth the effort.
I will write another blog entry related to custom shaped bokeh and tests I made (hopefully quite soon).
One of the shapes that I tried lead to interesting effect. It is the bokeh in the shape of the slit.
At first I tried to do it using my typical bokeh models (very patient, lot of personality and great at standing still) and my normal setup with some lights in the back.
Lights were not that interesting, but I noticed that the other elements of background looked blurred horizontally as well.
In most tutorials you will find tips suggesting to have distinct lights far in the back. However bokeh works also in full light outdoor conditions - custom shapes are just not as easy to notice. Even better! So my next attempts were concentrated on shooting slit bokeh during the day.
Both camera position and photographed object did not move during shooting following pictures:
Conclusion is that slit shaped cutout makes bokeh effect similar to motion blur (direction depends on angle of the slit). It is not exactly the same blur effect you get when panning picture aiming at fast moving object, but close.
I'm not great at panning - high percentage of my panned pictures have main object blurred as well - this method had additional benefit for me. The object/model does not have to move at all. Having said that there are differences that many can dislike. For example picture of the car that is done with this motion blur bokeh will have wheels not blurred, while the one done with panning will have them blurred due to spinning. I will update this entry once I have photo good examples.
Update (18-02-2016): I tried to use it with landing plane. As the plane was far enough, the effect was almost not visible. So the motion blur bokeh method is better for objects that are really close. I will try with macro photography.
Update (18-02-2016): I tried to use it with landing plane. As the plane was far enough, the effect was almost not visible. So the motion blur bokeh method is better for objects that are really close. I will try with macro photography.
Tools needed:
- Lens with big aperture (mine is 50mm 1.4)
- Piece of cardboard/this paper.
- Scissors
- Way of attaching the shape in front of lens
Process:
- Cut the shape of the slit (few mm wide) in cardboard.
- Attach in front of the lens so the slit is positioned centrally.
- Set to aperture priority and open as wide as possible.
- Shoot object that is quite close with background far back.
Things to try next:
- Different widths of the slit.
- Slits in not linear shapes (waves, long ovals, zig-zags).


Great. I loved your post. It was pretty informative.Thanks
ReplyDeletephoto editing
Great blog with it's name, great stuffs with great blog,Thanks.
ReplyDeletePhoto Retouching Services